
Building a WordPress site on your own is not difficult, but it does take time, dedication, and a lot of hard work. Building a stable, robust, secure, and cohesive WordPress site can be quite a challenge for beginners. And, the process becomes trickier when you need to create the entire website online.
As a result, it’s apparent that you may have wanted to build a site yourself but don’t have time to do it online. If so, we have just the right guide for you. Building a WordPress site offline is actually pretty simple if you know what you’re doing. This article covers everything from installing WordPress to using the various themes available in the WordPress Repository for building the entire website.
Why Should You Consider Creating An Offline WordPress Site?
Creating a WordPress site offline is a great way to test and develop your website without worrying about breaking anything or having it seen by anyone. There are several reasons why you should consider building a WordPress site offline before launching it to the public.
1. Faster Development
By building a WordPress site offline, you can work on your site without having to worry about internet speed and connectivity issues. This will allow you to develop your site faster and more efficiently, as you can make changes and see the results immediately.
2. Improved Testing
Building a WordPress site offline also provides an ideal environment for testing. You can try out different themes, plugins, and customizations without affecting the live site. This allows you to identify any issues or bugs and resolve them before launching your site to the public.
3. Cost Effective
Developing a WordPress site offline is a cost-effective solution for many businesses and individuals. There is no need to purchase a hosting plan or domain name, as you can test and develop your site on your own computer. This can save you money, especially if you are just starting out or working on a small project.
4. Better Security
Offline building of a WordPress site provides better security for your site, as it is not accessible to the public. This minimizes the risk of hacking, malware, or other security threats that can compromise your site.
5. Customization
Creating an offline website also provides greater customization options. You can experiment with different themes, plugins, and customizations without the worry of leaking anything or revealing online. This allows you to create a unique and personalized website that meets your specific needs and requirements.
7 Simple Steps To Build A WordPress Website Offline
Before we get started, let’s first find out what kind of site we’re building. If it is a blog, then this might not apply much to you. Because there is not much to do offline for a simple blog website. However, in any case, building a WordPress site offline is a great way to test and develop your website before launching it to the public. This process allows you to experiment with themes, plugins, and customizations without worrying about breaking anything or having it seen by anyone.
Now, let’s guide you through the seven simple steps to build a WordPress site offline and get it up and running on a local server.
- Install XAMPP
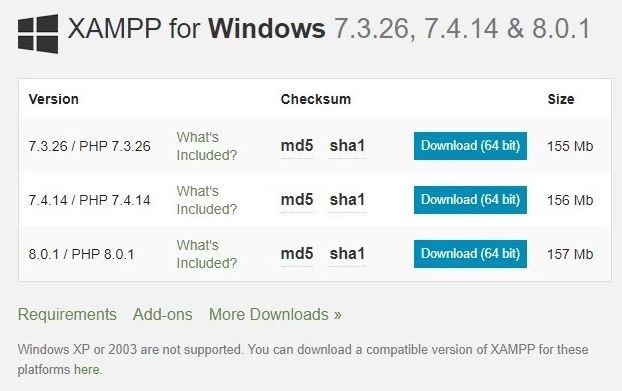
The first step in building a WordPress site offline is to install XAMPP, which is free, open-source software that allows you to run a web server on your local computer. XAMPP comes with Apache, PHP, and MariaDB (MySQL), the necessary components to run a WordPress site. You can download XAMPP from the Apache Friends website.
- Create a Database

Once XAMPP is installed, you need to create a database for your WordPress site. To do this, go to http://localhost/phpmyadmin in your web browser, and log in with the default username and password (usually ‘root’). Click on the ‘Databases’ tab and create a new database with a name of your choice.
- Download WordPress
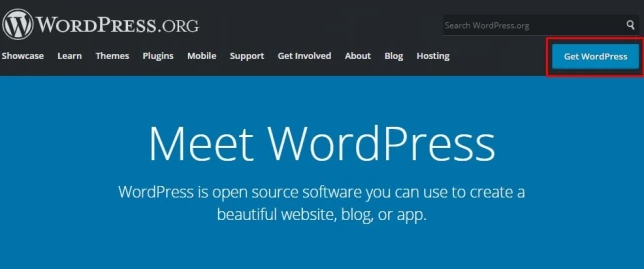
Next, download the latest version of WordPress from the official website and extract the files to a directory on your computer. Rename the extracted folder to the name you want for your website.
- Configure WordPress
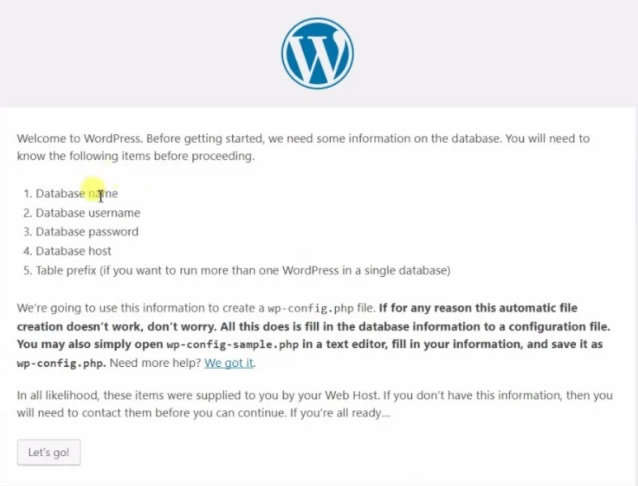
Open the WordPress folder and locate the ‘wp-config-sample.php’ file. Rename it to ‘wp-config.php’ and open it in a text editor. Find the section that says ‘// ** MySQL settings – You can get this info from your web host **’ and replace the values with the database name, username, and password you created in step 2. Save the changes and close the file.
- Transfer the WordPress files
Move the entire WordPress folder to the ‘htdocs’ directory in the XAMPP installation folder (usually located in ‘C:\xampp\htdocs’ on Windows or ‘Applications/XAMPP/htdocs’ on macOS).
- Install WordPress
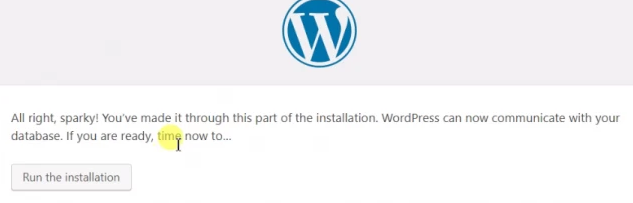
Open your web browser and go to ‘http://localhost/[your website folder name]’ to start the WordPress installation process. Follow the on-screen instructions to complete the installation, including setting up an administrative username and password.
- Customize Your Site
Once you have completed the installation process, you can start customizing your WordPress site. You can install themes and plugins and add your own content to make your site look and function the way you want. Finally, you can have a fully functional WordPress site running on your local computer in no time.
What To Do After Building A WordPress Site Offline?
To be frank, building a WordPress site offline is just the first step in creating a successful online presence. To get the most out of your site, you need to take several necessary steps after creation. So, once your site is complete and ready for launch, you need to follow the below steps:
- Move Your Site to a Live Server
The first step is to move your site from your local computer to a live server. This involves transferring all the WordPress files and database to a web host. You can either use a web hosting company or set up your own server.
- Set Up a Domain Name
Once your site is on a live server, you need to set up a domain name. A domain name is the web address that people use to access your site. You can purchase a domain name from a domain registrar, such as GoDaddy or Namecheap.
- Configure Your WordPress Settings
After your domain name is set up, you should configure your WordPress settings. This includes updating the site URL, setting up permalinks, and updating the theme and plugin settings. It is also essential to configure security settings, such as adding an SSL certificate, setting up a firewall, and enabling backups.
- Optimize Your Site for Search Engines
Next, you need to optimize your site for search engines. This includes adding relevant keywords to your content, optimizing images, and submitting your site to search engines. This will help your site rank higher in search results and attract more visitors.
- Launch Your Site
Once your site is fully configured and optimized, it is time to launch it to the public. You can make a soft launch by inviting friends and family to test your site or make a full launch by promoting it on social media and other channels.
- Monitor Your Site
After launching your site, it is important to monitor it to ensure everything is working properly. This includes checking for broken links, monitoring site traffic, and checking for updates to your theme and plugins. You should also regularly back up your site to protect against data loss.
How To Import An Offline WordPress Site?
Importing is a crucial task that you should do to move your website to web WordPress after finishing the website-building process. So, once your site is ready to go live, you will need to import it to a live server. Without importing correctly, your website won’t be usable for users and visitors. That’s why you need to perform the WordPress website importing process carefully.
- Export Your Offline WordPress Site
The first step in importing an offline WordPress site is to export it. To do this, you will need to access your offline WordPress installation and go to the ‘Tools section of the dashboard. From here, select the ‘Export’ option and export your site’s content and database.
- Create a New WordPress Installation
Next, you will need to create a new WordPress installation on your live server. You can either install WordPress manually or use a one-click install option provided by your web host.
- Import Your Offline WordPress Site
Once you have a new WordPress installation, you can import your offline WordPress site. Go to the ‘Tools section of the dashboard and select the ‘Import’ option. Choose the ‘WordPress’ option and select the file you exported from your offline WordPress site.
- Update Your Site’s Settings
After importing your offline WordPress site, you will need to update your site’s settings. This includes updating the site URL, permalink structure, and theme settings. You will also need to update your plugins and activate any necessary ones.
- Check Your Site
Finally, you should check your site to ensure everything is working properly. This includes checking your pages, posts, and images to ensure that they have been imported correctly. You should also check your site’s functionality, such as contact forms and navigation menus, to ensure that they are working as expected.
Frequently Asked Questions
Can I Edit WordPress Theme Offline?
Yes, you can edit a WordPress theme offline. To do this, you will need to download and install a local development environment, such as XAMPP or WAMP. You can then install WordPress on your local computer and make changes to your theme’s files. Once you are satisfied with your changes, you can then upload the updated theme files to your live site. This process allows you to make changes to your theme without affecting your live site.
Is It Possible To Take A WordPress Site Offline Without Plugin?
Yes, it is possible to take a WordPress site offline without using a plugin. This can be done by modifying the .htaccess file in your WordPress root directory. By adding specific code to this file, you can redirect visitors to a maintenance page or display a ‘Coming Soon’ message. However, it is essential to note that taking your site offline in this way requires a certain level of technical skill, and caution should be taken to ensure that your site remains accessible to you and any necessary administrators.
What Are The Local Hosts To Build A WordPress Site Offline?
To build a WordPress site offline, you need a local host environment. There are several local hosts that you can use, including XAMPP, WAMP, and MAMP. These local hosts allow you to create a local development environment that mimics a live web server, allowing you to build and test your WordPress site offline. Each local host has its own features and benefits, so choosing one that best suits your needs and experience level is important. Once you have a local host, you can install WordPress and start building your site offline.
Summary
In the end, building your WordPress site offline isn’t the be-all, end-all solution to creating your site on the fast track, but it will help you out in a pinch. The steps outlined above are simple and can be done by anyone with basic knowledge of FTP and HTML, even if you’re not a designer. So grab your favorite beverage, power up your laptop, and start building your website.