

We all know that JavaScript is something you’ll find on pretty much every website out there. Over the years, more and more websites have started adding it to their pages, letting users use and manage them in the most intuitive and easy way. But how do you add JavaScript to your Shopify store?
Gladly, adding JavaScript to Shopify is one of the easiest things you can do. You have various options available to make this happen. But regardless of which method you use, it’s important to remember that it’s your responsibility to ensure that whatever you’re doing will work both internally and externally as needed. So let’s get started…

How Do I Add JavaScript To Your Shopify
You know, Shopify is a popular e-commerce platform that allows users to create and manage their online stores. One of the features that make Shopify so versatile is the ability to add custom JavaScript to enhance the functionality of your store and create a unique user experience for your customers. Here’s the step-by-step process on how to add JavaScript to Shopify:
- Access your Shopify Admin
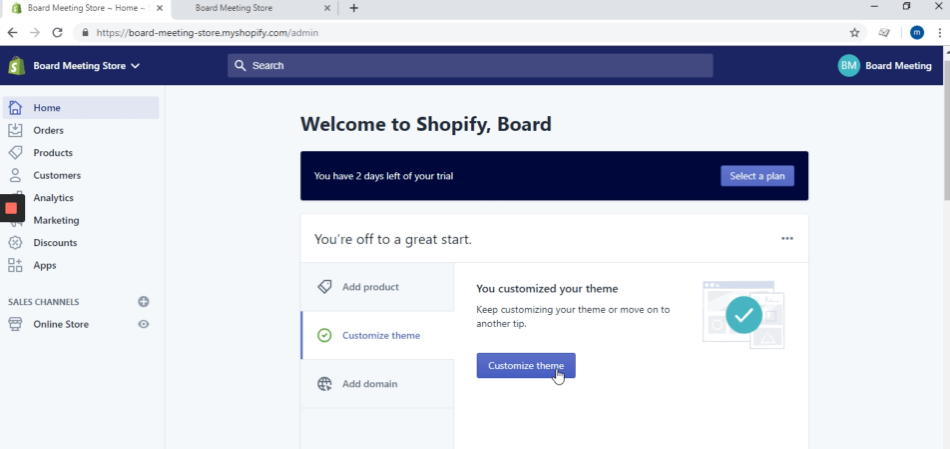
Firstly, log in to your Shopify account and go to your Shopify Admin. From there, you’ll be able to access the backend of your store and make changes to its design and functionality.
- Choose the Theme you want to edit
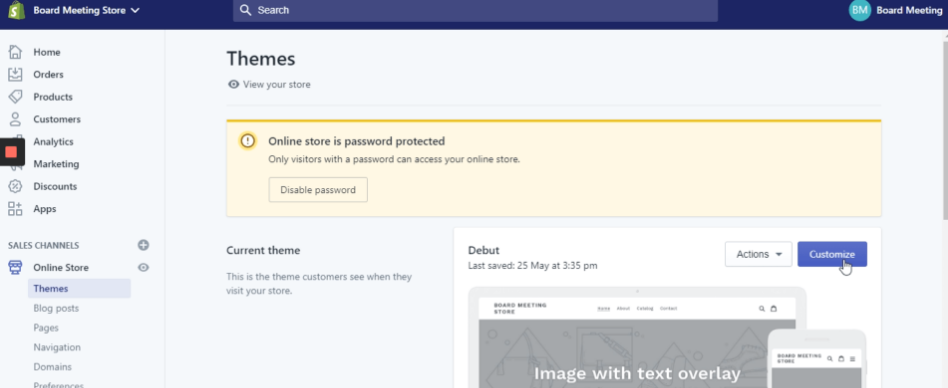
In the Shopify Admin, go to the ‘Online Store’ section and click on ‘Themes.’ From there, you can choose the theme to which you want to add JavaScript.
- Find the Assets Folder
In the theme editor, click on the ‘Actions’ drop-down menu and select ‘Edit Code.’ This will take you to the theme’s code editor, where you’ll see all the files associated with your theme, including the ‘assets’ folder.
- Create a new JavaScript file
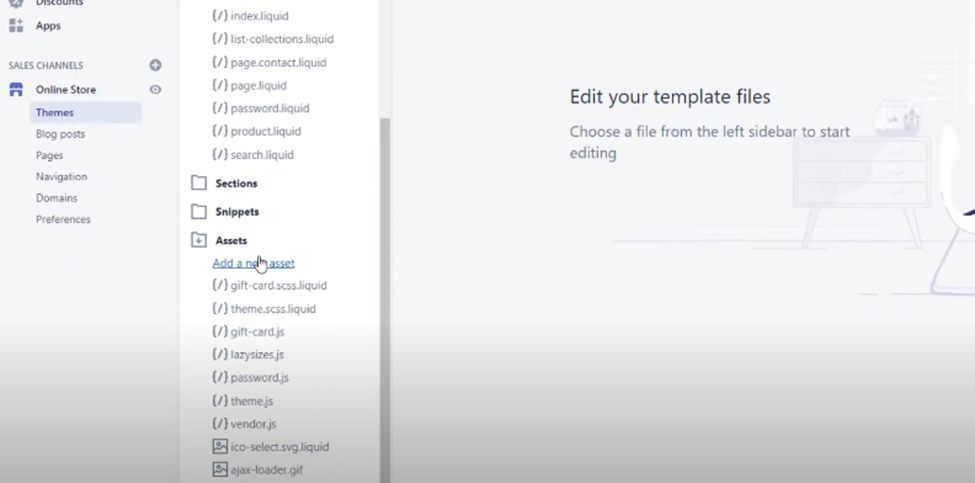
In the ‘assets’ folder, click on the ‘Add a new asset’ button and select ‘Create a new JavaScript file.’ Give the file a descriptive name, such as ‘custom.js’, and click on ‘Create.’
- Add your JavaScript code
Once you’ve created your new JavaScript file, you can start adding your custom code. You can either copy and paste the code from an external source or write your own code from scratch. Make sure to save your changes before moving on to the next step.
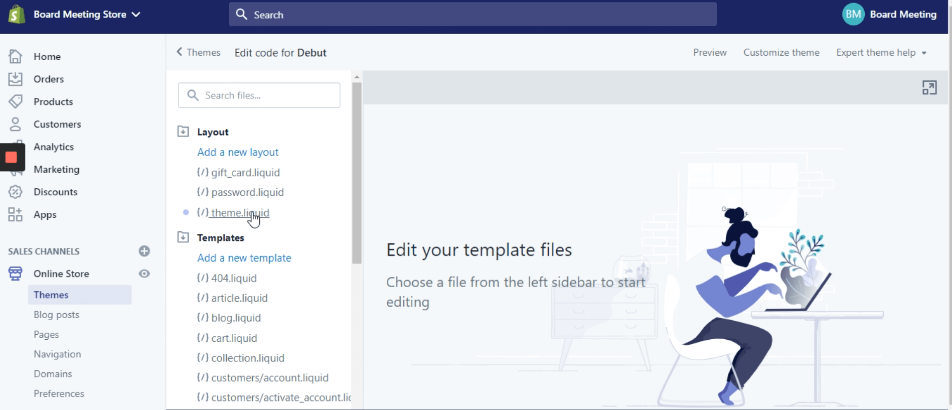
- Link the JavaScript file to your theme
In order for the custom JavaScript code to work, you need to link the file to your theme. To do this, go back to the theme editor and find the ‘theme.liquid’ file. In the file, scroll down to the bottom of the page and add the following PHP code:
<script src=”{{ ‘custom.js’ | asset_url }}”></script>
- Save and Preview your Changes

Once you’ve linked your custom JavaScript file to your theme, save your changes and preview your store to see the results. If everything is working as expected, you can then publish your changes to make them live in your store.
How To Add JavaScript To An Individual Shopify Page
Sometimes you may need to add custom JavaScript to individual pages of your Shopify store. Specifically, this can be useful for adding unique features, tracking scripts, or customizing the user experience on specific pages. Follow the below steps to add JavaScript to an individual Shopify page:
- Access the Shopify Admin
Like the above method, log in to your Shopify account and go to your Shopify Admin. Here, you can access all the functions of your Shopify store and control the options as well as codes.
- Find the Page you want to edit
In the Shopify Admin, go to the ‘Online Store’ section and click on ‘Pages.’ From there, you can find the page to which you want to add JavaScript and click on ‘Edit’ to access its code.
- Add the JavaScript code
Once you’re in the page editor, you can add your custom JavaScript code directly into the page’s HTML (HyperText Markup Language). Place the code in between the ‘<head>’ and ‘</head>’ tags, or anywhere else on the page, depending on what you want to achieve. Make sure to save your changes before moving on to the next step.
- Preview the Page
Before publishing your changes, it’s always a good idea to preview the page to make sure the JavaScript code is working as expected. You can do this by clicking on the ‘Preview’ button on the page editor.
- Publish the Page
Once you’re satisfied with the changes, you can publish the page by clicking on the ‘Save’ button. Your custom JavaScript code will now be live on the page and accessible to your customers.
Frequently Asked Questions
How Can I Add JavaScript To Shopify Themes?
To add JavaScript to a Shopify theme, access the theme editor in the Shopify Admin, create a new JavaScript file in the assets folder, add your custom code, and link the file to the theme by adding a script tag in the theme.liquid file, save and preview changes. You can use JavaScript to enhance the functionality and visual appearance of your Shopify theme.
Can I Write JavaScript In Shopify?
Yes, you can write JavaScript in Shopify. You can access the theme editor in the Shopify Admin and create a new JavaScript file in the assets folder to add custom JS code. In addition, linking the file to the theme using a script tag in the theme.liquid file allows for easy management of your custom scripts.
Is It Possible To Add JS And CSS Code To My Shopify Website?
Yes, it is possible to add both JavaScript and CSS code to your Shopify website in some straightforward methods, such as using inline scripts or adding code directly to theme files.
However, these methods are generally not recommended as they can make it challenging to manage your code and make future updates to your site. It’s better to use the recommended slow method of creating new asset files and linking them to the theme using script and link tags. This provides a more organized and scalable approach to customizing your Shopify website.
Conclusion
Ultimately, Shopify allows for a lot of flexibility with regard to the way in which a user interacts with your store. Adding JavaScript allows you to take things a step further, providing an entirely new way for users to navigate your site. Your imagination is the only limit as it pertains to what sort of functionality you might want to add to your store.
Regardless of what kind of functionality you are trying to add, you must follow the steps outlined above.